Best Christmas Desserts
If you’re looking for the best Christmas desserts for your table this year then we have good news – your search is over.
Christmas is the hap-hap-happiest time of year, and we think that’s because our tummies are always full of sugar and spice and all things nice.
It’s that one time of year when thoughts about a diet can go out the window while we make memories with the people we love.
Here we have collated some of the best dessert recipes we have found and made ourselves to help bring more Christmas cheer to your kitchen this year.
Best Christmas Desserts
Christmas Pandoro Tiramisu
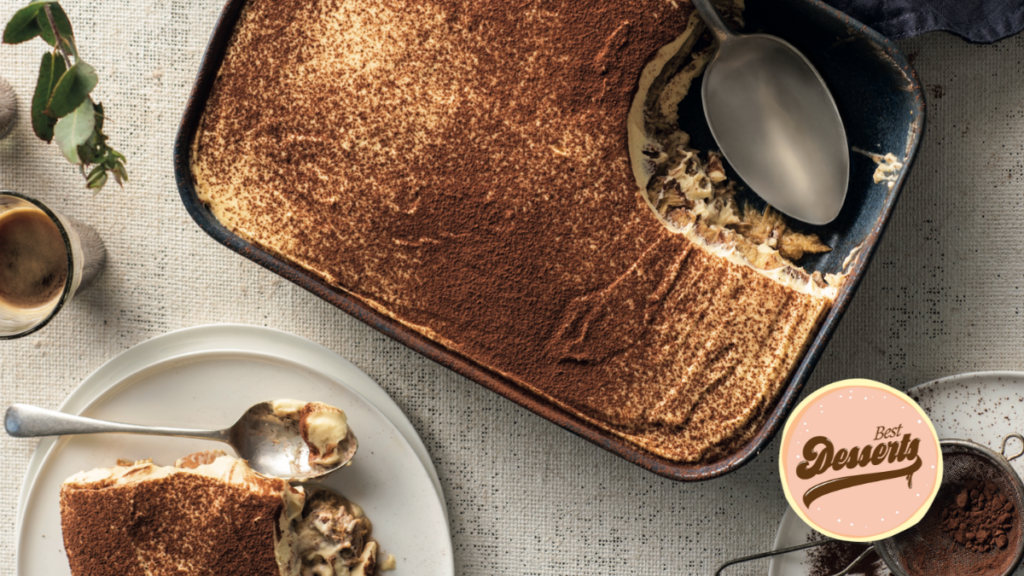
Whisk yolks and sugar with an electric mixer until pale and creamy, about 5 minutes; gently fold in mascarpone and cream, mixing lightly until well combined.
Spread some of the mascarpone cream into the base of a 30cm-square ceramic dish; top with a single layer of pandoro slices; brush or drizzle some combined coffee and liqueur onto pandoro; cover with one-third of the mascarpone cream. Repeat layers 2 times, ending with the cream. Cover with plastic wrap and refrigerate for at least 2 hours.
Dust generously with cocoa powder and serve.
Recipe Notes: Store in the refrigerator for no more than 3 days, but it probably won’t even last that long!
This recipe can also be made with panettone or brioche.
Ingredients
Directions
Whisk yolks and sugar with an electric mixer until pale and creamy, about 5 minutes; gently fold in mascarpone and cream, mixing lightly until well combined.
Spread some of the mascarpone cream into the base of a 30cm-square ceramic dish; top with a single layer of pandoro slices; brush or drizzle some combined coffee and liqueur onto pandoro; cover with one-third of the mascarpone cream. Repeat layers 2 times, ending with the cream. Cover with plastic wrap and refrigerate for at least 2 hours.
Dust generously with cocoa powder and serve.
Christmas Tree Skewers
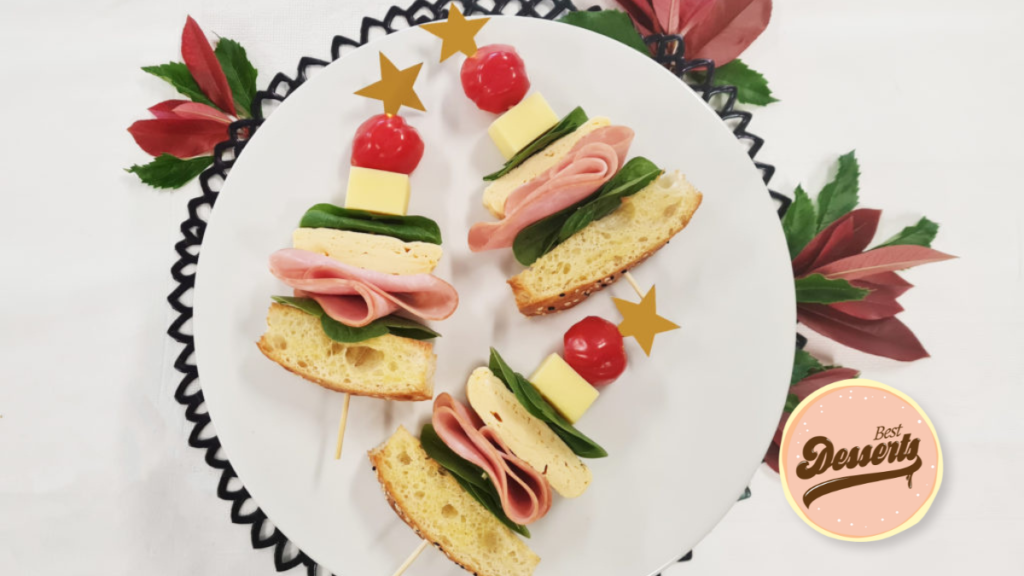
Cut bread into slices 7cm wide, sprinkle with a little oil, and bake in the oven @ 170°c until golden brown.
Crack eggs into a bowl, add water and salt and pepper.
Whisk gently with a fork to break up the eggs.
Heat a non-stick pan over medium heat, add a small amount of oil and butter.
Add egg mixture to the pan, moving around to cover completely, gently scrape the base of the pan to allow the runny egg to cook.
When nearly cooked, stop scraping the base and allow to cook through.
Using a spatula, fold egg in half to create omelette shape.
Remove from pan onto cutting board and cut the omelette to 1.5cm thick.
Cut cheese into cubes and use a knife to cut extra cheese into star shapes (optional).
Assemble Christmas trees – thread the toast, spinach, ham, omelette and cheese onto bamboo skewers, to create a Christmas tree shape.
Top with a red cherry tomato and cheese star.
Serve on a platter.
Ingredients
Directions
Cut bread into slices 7cm wide, sprinkle with a little oil, and bake in the oven @ 170°c until golden brown.
Crack eggs into a bowl, add water and salt and pepper.
Whisk gently with a fork to break up the eggs.
Heat a non-stick pan over medium heat, add a small amount of oil and butter.
Add egg mixture to the pan, moving around to cover completely, gently scrape the base of the pan to allow the runny egg to cook.
When nearly cooked, stop scraping the base and allow to cook through.
Using a spatula, fold egg in half to create omelette shape.
Remove from pan onto cutting board and cut the omelette to 1.5cm thick.
Cut cheese into cubes and use a knife to cut extra cheese into star shapes (optional).
Assemble Christmas trees – thread the toast, spinach, ham, omelette and cheese onto bamboo skewers, to create a Christmas tree shape.
Top with a red cherry tomato and cheese star.
Serve on a platter.
Peanut Butter Hazelnut Christmas Trees

Blend 1 can coconut milk with Mayver’s Peanut Butter and ½ the honey. And the other can of coconut milk with Mayver’s Cacao & Hazelnut Spread and other ½ of the honey. Pour into ice-cream mould’s and let set in freezer.
Once set, drizzle with peanut butter or cacao spread before enjoying.
Ingredients
Directions
Blend 1 can coconut milk with Mayver’s Peanut Butter and ½ the honey. And the other can of coconut milk with Mayver’s Cacao & Hazelnut Spread and other ½ of the honey. Pour into ice-cream mould’s and let set in freezer.
Once set, drizzle with peanut butter or cacao spread before enjoying.
Toasted Hazelnut and Pear Dressing
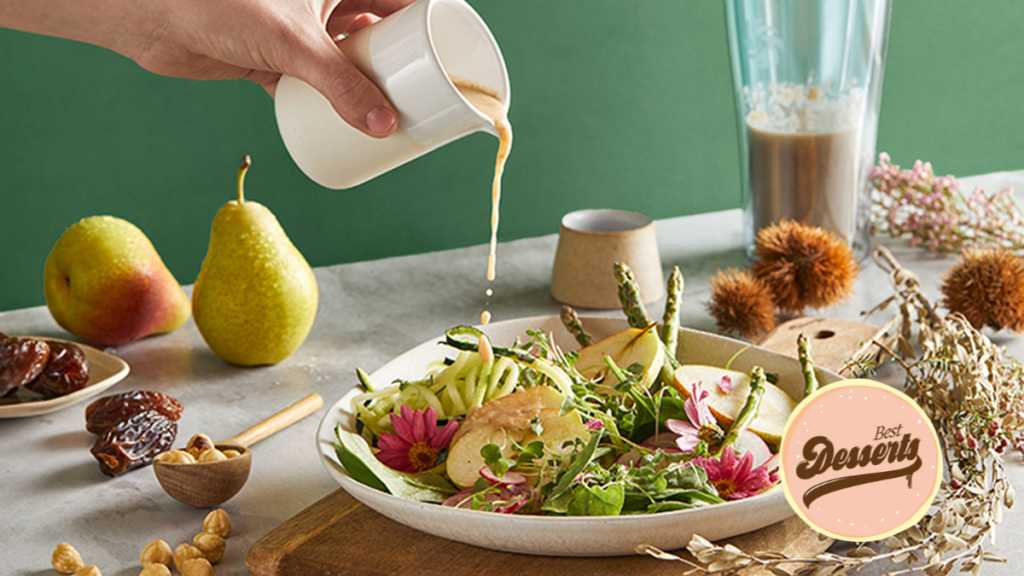
Place all ingredients into the Vitamix container in the order listed and secure the blade base.
Start the blender at its lowest speed, then quickly increase it to its highest speed. Blend for 1 minute. Refrigerate until chilled before serving.
Ingredients
Directions
Place all ingredients into the Vitamix container in the order listed and secure the blade base.
Start the blender at its lowest speed, then quickly increase it to its highest speed. Blend for 1 minute. Refrigerate until chilled before serving.
Tis The Season Smoothie
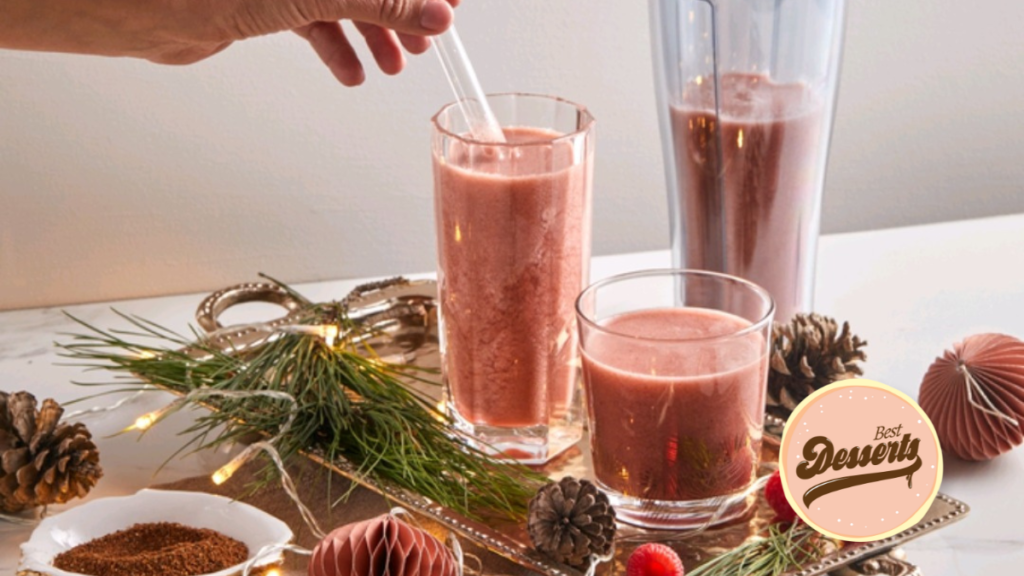
Place all ingredients into the Vitamix container in the order listed and secure the lid.
Start the blender at its lowest speed, then quickly increase it to its highest speed.
Blend for 45 seconds or until desired consistency is reached, using the tamper to push ingredients toward the blades.
Ingredients
Directions
Place all ingredients into the Vitamix container in the order listed and secure the lid.
Start the blender at its lowest speed, then quickly increase it to its highest speed.
Blend for 45 seconds or until desired consistency is reached, using the tamper to push ingredients toward the blades.
Holiday Sugar Cookies
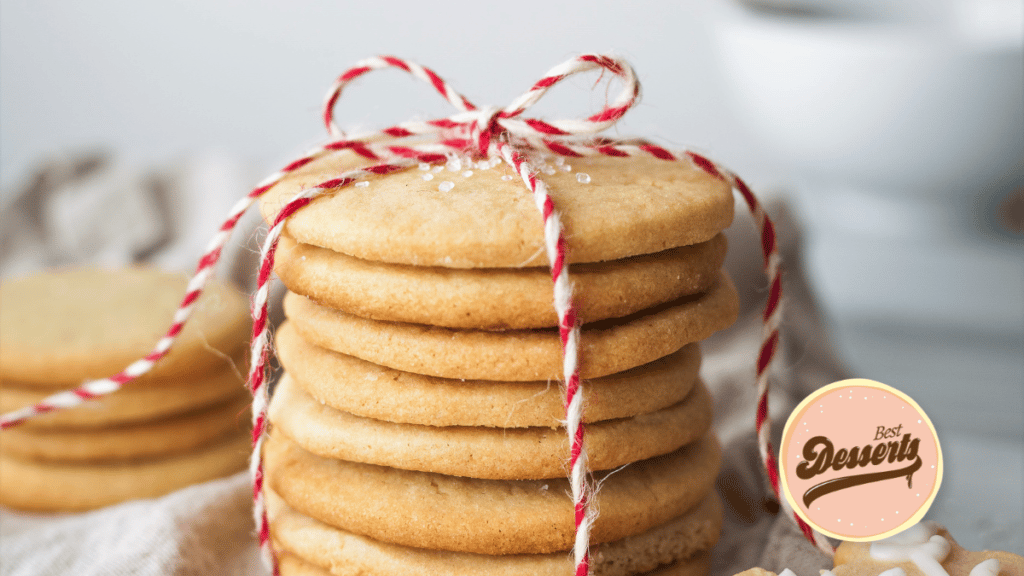
Preheat oven to 190°C (375°F). Line a baking sheet with baking paper.
Place butter, sugar, almond extract, and egg into your Vitamix container in the order listed and secure the lid.
Select the lowest setting. Start the machine, slowly increase speed to Variable 6, and blend for 20 seconds.
Remove the lid plug and begin Pulsing as you add in half of the flour and baking soda.
Stop the machine and scrape the container. Add the remaining flour and baking soda. Pulse 15 to 18 times on Variable 5, or until combined. If the dough becomes too thick, scrape the sides again.
Remove the dough and wrap it in plastic wrap. Chill in the refrigerator for 30 to 40 minutes.
Roll out the dough, cut it into desired shapes, and place it on the prepared baking sheet. Bake for 8 minutes, or until golden.
Ingredients
Directions
Preheat oven to 190°C (375°F). Line a baking sheet with baking paper.
Place butter, sugar, almond extract, and egg into your Vitamix container in the order listed and secure the lid.
Select the lowest setting. Start the machine, slowly increase speed to Variable 6, and blend for 20 seconds.
Remove the lid plug and begin Pulsing as you add in half of the flour and baking soda.
Stop the machine and scrape the container. Add the remaining flour and baking soda. Pulse 15 to 18 times on Variable 5, or until combined. If the dough becomes too thick, scrape the sides again.
Remove the dough and wrap it in plastic wrap. Chill in the refrigerator for 30 to 40 minutes.
Roll out the dough, cut it into desired shapes, and place it on the prepared baking sheet. Bake for 8 minutes, or until golden.
Walnut Mutekke
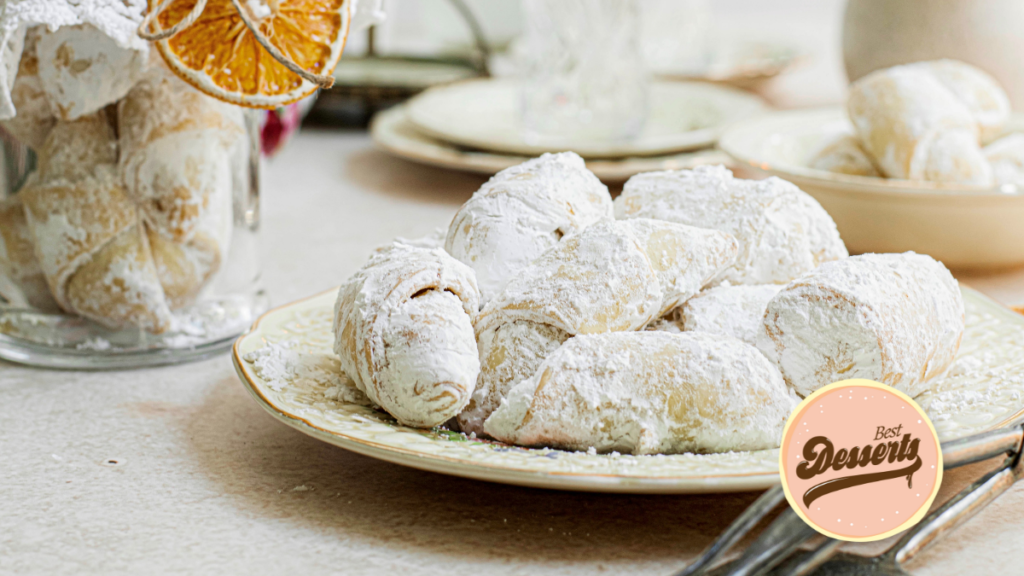
Place flour and cubed butter into a bowl of vitamix in listed order and pulse on speed 5 a few times until mixture resembles crumbs (3-5 pulses within 3-4 second intervals).
Move the mixture to a bench or a mixing bowl, make a well in the centre and add sour cream and egg yolk. Mix gently until dough comes together. Divide dough into 2 equal pieces, shape into discs, wrap in cling film and set aside to rest for at least 30 minutes.
In the meantime make the walnut filling, prepare and line cooking tray and preheat oven to 160C Fan Forced.
To make the walnut filling place all ingredients into the bowl of vitamix and pulse on speed 5 until your mixture turns into a paste with some walnuts still remaining in small chunks for texture.
Place one of the dough discs onto lightly floured bench and roll to 5mm thick. Cut into 8 triangles like you would with pizza. Place 1 tsp of walnut mixture onto wide end of each triangle, tuck the wide sides and roll towards the end point.
Place mutekke cookies on a tray and bake for 20-25 minutes or until golden. Remove from oven, move to a cooling rack. Once cooled roll in icing sugar.
Ingredients
Directions
Place flour and cubed butter into a bowl of vitamix in listed order and pulse on speed 5 a few times until mixture resembles crumbs (3-5 pulses within 3-4 second intervals).
Move the mixture to a bench or a mixing bowl, make a well in the centre and add sour cream and egg yolk. Mix gently until dough comes together. Divide dough into 2 equal pieces, shape into discs, wrap in cling film and set aside to rest for at least 30 minutes.
In the meantime make the walnut filling, prepare and line cooking tray and preheat oven to 160C Fan Forced.
To make the walnut filling place all ingredients into the bowl of vitamix and pulse on speed 5 until your mixture turns into a paste with some walnuts still remaining in small chunks for texture.
Place one of the dough discs onto lightly floured bench and roll to 5mm thick. Cut into 8 triangles like you would with pizza. Place 1 tsp of walnut mixture onto wide end of each triangle, tuck the wide sides and roll towards the end point.
Place mutekke cookies on a tray and bake for 20-25 minutes or until golden. Remove from oven, move to a cooling rack. Once cooled roll in icing sugar.
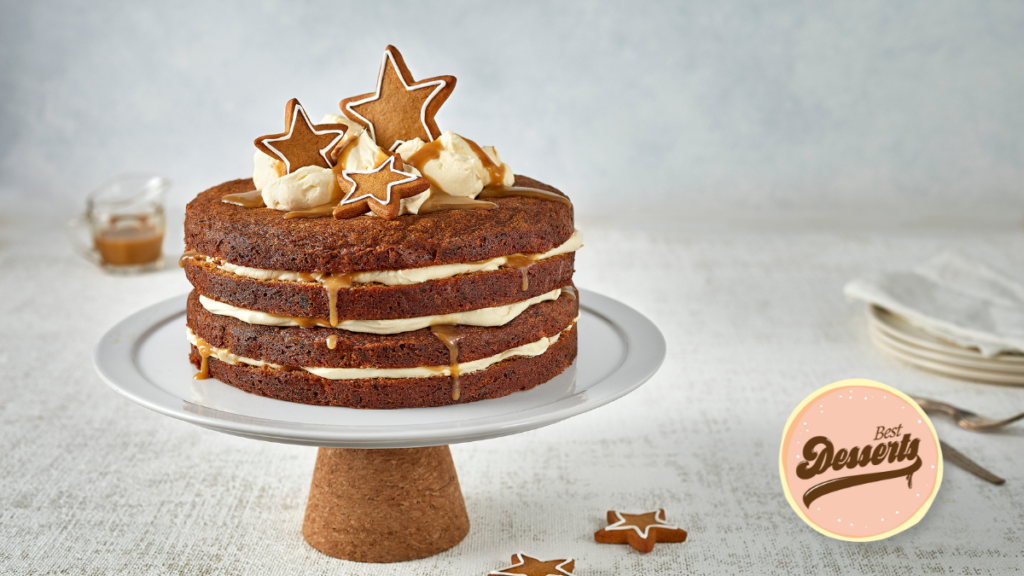
Gingerbread Latte Cake with Gingerbread Coffee Syrup
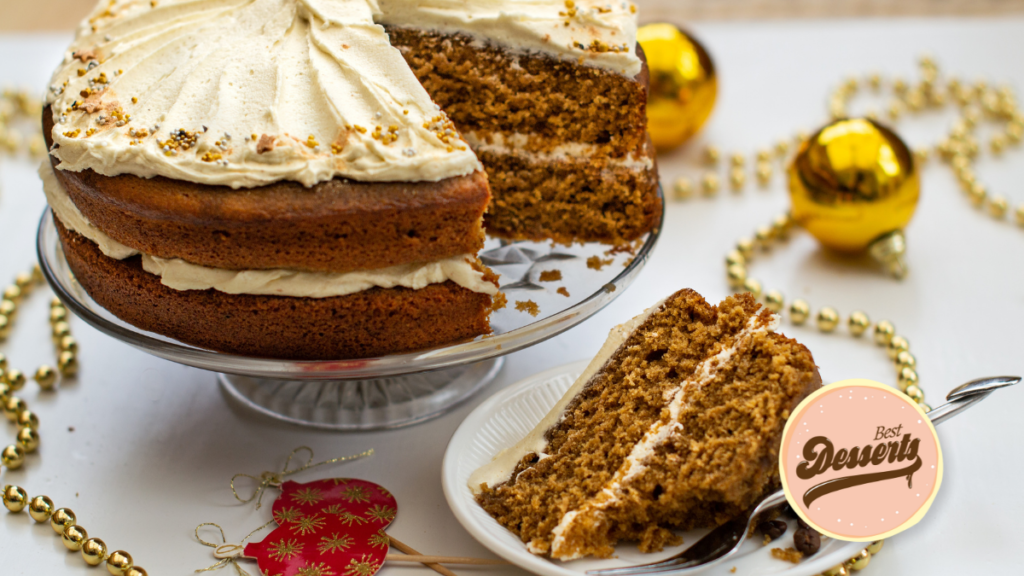
Preheat the oven to Gas 4/180°C/fan 160°C. Grease the base and sides of two 20cm round cake tins. Line the bases with baking paper.
Beat the butter and sugar with an electric whisk until light and creamy. The longer you beat, the fluffier your sponges will be.
Add the treacle, syrup, eggs, egg yolks and gingerbread syrup and mix until well combined.
Sift together the flour, spices, baking powder and salt. Add to the wet ingredients in two batches, alternating each time with the warmed milk. Beat until nicely combined.
Divide the mixture between the two tins. Bake in the oven for 25 mins, or until the sponges are risen and golden and a skewer inserted into the centre comes out clean. Leave the sponges in the tins while you make the coffee syrup.
Brew your coffee for the coffee syrup. Add it to a bowl and stir in the sugar. Keep stirring until the sugar is dissolved and doesn’t feel grainy in the bowl. Drizzle or brush the syrup over the surface of the sponges. You want to use around three or four tbsp of the syrup per sponge – you’re not trying to flood them! Remove from the tins when cool.
Next, make the gingerbread buttercream. Beat the butter for about five minutes until soft and very pale. Add the gingerbread syrup.
Sift the icing sugar and add it gradually to the butter mixture. Beat well after each addition. If your frosting is a little stiff once you’ve added all the icing sugar, beat in a dribble of milk.
Remove the sponges from the tins and spread buttercream on one of them. Pop the second on top and decorate with the rest of the buttercream. Finish with sprinkles and serve!
Ingredients
Directions
Preheat the oven to Gas 4/180°C/fan 160°C. Grease the base and sides of two 20cm round cake tins. Line the bases with baking paper.
Beat the butter and sugar with an electric whisk until light and creamy. The longer you beat, the fluffier your sponges will be.
Add the treacle, syrup, eggs, egg yolks and gingerbread syrup and mix until well combined.
Sift together the flour, spices, baking powder and salt. Add to the wet ingredients in two batches, alternating each time with the warmed milk. Beat until nicely combined.
Divide the mixture between the two tins. Bake in the oven for 25 mins, or until the sponges are risen and golden and a skewer inserted into the centre comes out clean. Leave the sponges in the tins while you make the coffee syrup.
Brew your coffee for the coffee syrup. Add it to a bowl and stir in the sugar. Keep stirring until the sugar is dissolved and doesn’t feel grainy in the bowl. Drizzle or brush the syrup over the surface of the sponges. You want to use around three or four tbsp of the syrup per sponge – you’re not trying to flood them! Remove from the tins when cool.
Next, make the gingerbread buttercream. Beat the butter for about five minutes until soft and very pale. Add the gingerbread syrup.
Sift the icing sugar and add it gradually to the butter mixture. Beat well after each addition. If your frosting is a little stiff once you’ve added all the icing sugar, beat in a dribble of milk.
Remove the sponges from the tins and spread buttercream on one of them. Pop the second on top and decorate with the rest of the buttercream. Finish with sprinkles and serve!
Chai Spiced Mince Pies
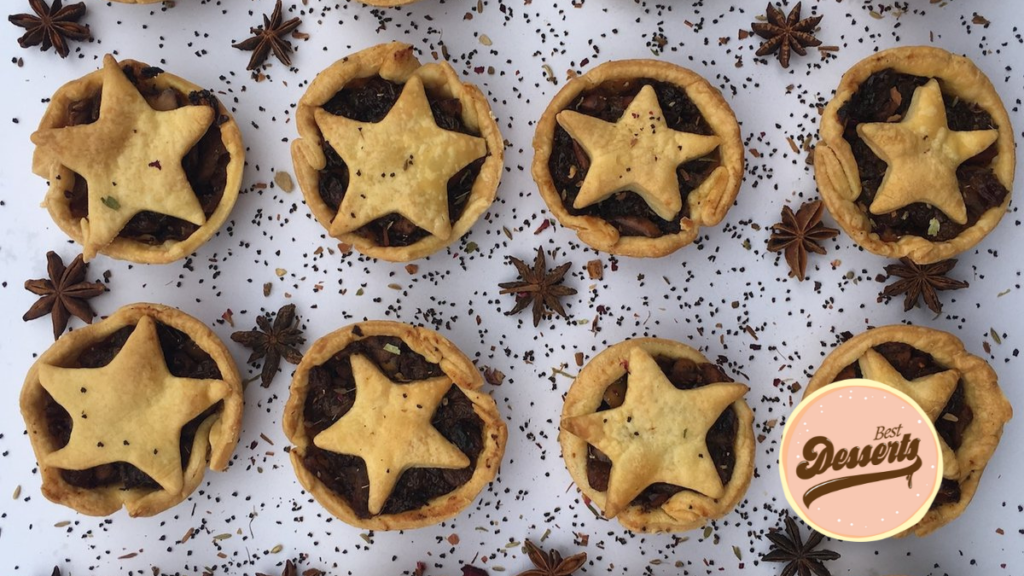
To prepare the fruit mixture, finely chop half of the mixed fruit and put it into a large bowl.
Add brown sugar, almonds, chopped apple pieces, butter, brandy (if using), lemon rind, lemon juice, ground chai and the remaining mixed fruit. Note: if you're not using brandy, replace with 1 tablespoon of water.
Stir until well combined. Cover with a reusable wrap or lid and set aside overnight, stirring occasionally, to macerate (infuse the fruit - yum!).
The next day: Transfer the fruit mixture to a fine sieve over a bowl and stir to remove excess liquid.
To make the pastry, place the flour, sugar and butter in the bowl of a food processor and process until the mixture resembles fine breadcrumbs.
Add the egg yolk and 2 tablespoons of water. Mix until it starts to come together, then put it onto your clean bench.
Using your hands, shape the dough into a round and cover it with a reusable wrap.
Place in the fridge for 20 minutes to cool and rest.
Preheat your oven to 180C.
Roll out the pastry on a lightly floured surface until approximately 5mm/.5cm thick.
Use something round to cut circles into the pastry. You can use a pastry cutter-shape (we used one that was 8.5cm in diameter), or even a glass jar or cup. Cut out 20 rounds.
Using a 5cm-diameter star-shaped pastry cutter, cut 20 stars from the remaining pastry. If you don't have a cutter, use a sharp knife and get creative!
Line twenty 80ml (1/3-cup) capacity muffin pans with pastry discs.
Divide the fruit mince among the pastry cases. Top with pastry stars.
Brush the stars lightly with the egg and sprinkle with white sugar.
Bake for 20-25 minutes or until light golden.
Set aside in the pans for 5 minutes to cool before transferring to a wire rack to cool completely.
Serve with a steaming cup of fresh chai!
*Uppma has used the ground Chai Dust for this recipe, which is the gorgeous Golden Chai that they grind in house. This makes it super simple to add to any baking. However, you can also use any of their chai blends (even the Caffeine Free blends) and simply grind these to a powder at home using a coffee or spice grinder.
Ingredients
Directions
To prepare the fruit mixture, finely chop half of the mixed fruit and put it into a large bowl.
Add brown sugar, almonds, chopped apple pieces, butter, brandy (if using), lemon rind, lemon juice, ground chai and the remaining mixed fruit. Note: if you're not using brandy, replace with 1 tablespoon of water.
Stir until well combined. Cover with a reusable wrap or lid and set aside overnight, stirring occasionally, to macerate (infuse the fruit - yum!).
The next day: Transfer the fruit mixture to a fine sieve over a bowl and stir to remove excess liquid.
To make the pastry, place the flour, sugar and butter in the bowl of a food processor and process until the mixture resembles fine breadcrumbs.
Add the egg yolk and 2 tablespoons of water. Mix until it starts to come together, then put it onto your clean bench.
Using your hands, shape the dough into a round and cover it with a reusable wrap.
Place in the fridge for 20 minutes to cool and rest.
Preheat your oven to 180C.
Roll out the pastry on a lightly floured surface until approximately 5mm/.5cm thick.
Use something round to cut circles into the pastry. You can use a pastry cutter-shape (we used one that was 8.5cm in diameter), or even a glass jar or cup. Cut out 20 rounds.
Using a 5cm-diameter star-shaped pastry cutter, cut 20 stars from the remaining pastry. If you don't have a cutter, use a sharp knife and get creative!
Line twenty 80ml (1/3-cup) capacity muffin pans with pastry discs.
Divide the fruit mince among the pastry cases. Top with pastry stars.
Brush the stars lightly with the egg and sprinkle with white sugar.
Bake for 20-25 minutes or until light golden.
Set aside in the pans for 5 minutes to cool before transferring to a wire rack to cool completely.
Serve with a steaming cup of fresh chai!
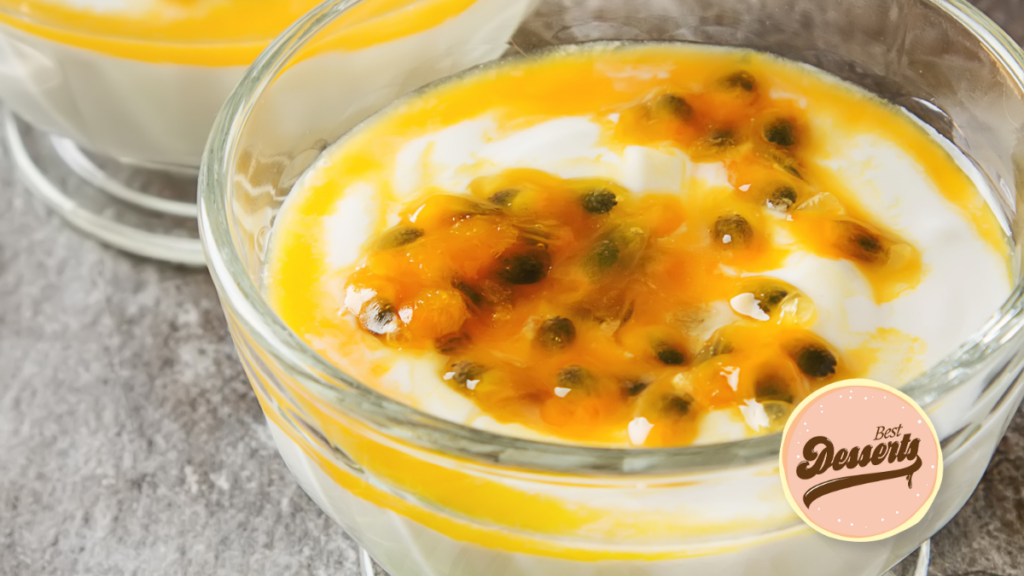
Peach and Passionfruit Ricotta Cheesecakes
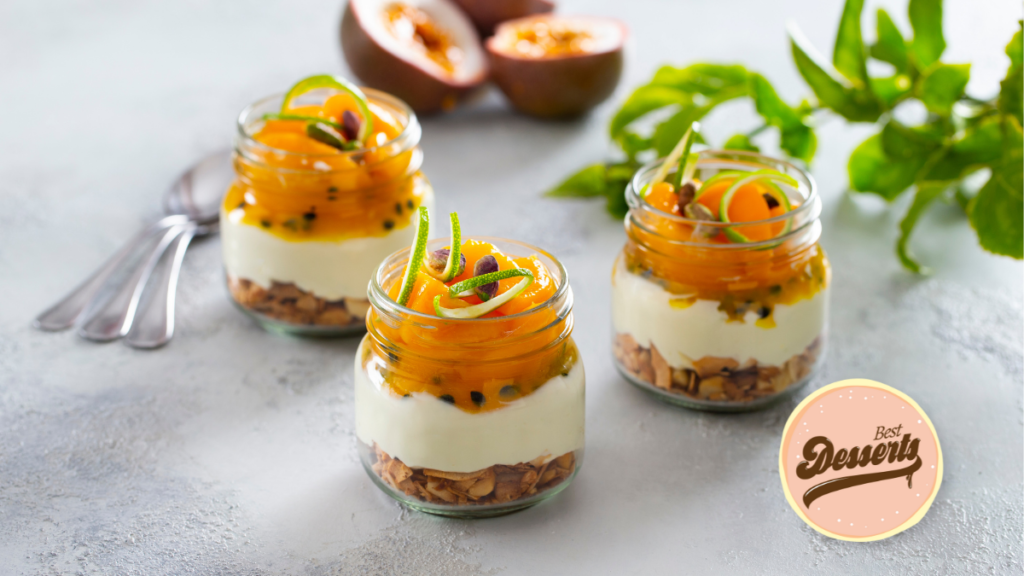
Pull out the cream cheese and ricotta from the fridge to warm up a little.
Toast coconut and macadamias in a dry fry pan over medium heat for a few minutes - stir regularly to avoid burning. It should be golden and smell delicious.
In a large bowl, beat cream cheese, ricotta, lime zest and juice, vanilla, and juice from the peaches with an electric beater.
In 6 jars, layer the coconut and macadamia, followed by the cream cheese mix, then spoon over the passionfruit pulp and top with peaches.
Screw the lids on and keep refrigerated until ready to serve.
Notes:
- Use frozen passionfruit pulp if they’re not in season.
- Use peaches canned in juice (not syrup) to keep the sugar content low. This also means you can make these cheesecakes year round!
Ingredients
Directions
Pull out the cream cheese and ricotta from the fridge to warm up a little.
Toast coconut and macadamias in a dry fry pan over medium heat for a few minutes - stir regularly to avoid burning. It should be golden and smell delicious.
In a large bowl, beat cream cheese, ricotta, lime zest and juice, vanilla, and juice from the peaches with an electric beater.
In 6 jars, layer the coconut and macadamia, followed by the cream cheese mix, then spoon over the passionfruit pulp and top with peaches.
Screw the lids on and keep refrigerated until ready to serve.
Elato Charcuterie Board

Prepare all your items in advance so they’ll be ready and easy to simply lay on a bed of ice. Use a platter, board or tray with a little depth to it for the ice which looks great and of course, will help to keep the ice cream and accompaniments firm and appetising for longer.
To make the chocolate dip, combine broken chocolate pieces and coconut oil in a microwave safe cup or bowl. Microwave for 30 seconds on high, remove, and stir. Return to the microwave for 30 seconds on high, remove and stir. If not fully melted, return for 30 seconds. Dip your frozen fruit or frozen marshmallows into the melt.
Skewers are ideal for summer charcuterie boards. Fruit skewers in particular look great and allow for easy pick-up and dipping. Also, colour blocking is always effective on a charcuterie board and skewers offer a great way to colour block.
Choose a theme to please your guests – brightly coloured cake pops, snakes and frogs work a treat for kids and drunken chocolate-covered fruits for adults are sure to please.
Be sure to include fresh or frozen berries that aren’t chocolate-covered for those who want a healthier option and as a great complement to the ice cream.
Think outside the box: even salty items are a great accompaniment to ice cream. Crunchy textures work well with the softness and smoothness of ice cream. Salted pretzels, caramelised and salted nuts, chopped-up dried fruits, granola or even broken left-over biccies from the pantry are great. A simple coulis to pour on top of the ice cream is also a crowd pleaser.
Ingredients
Directions
Prepare all your items in advance so they’ll be ready and easy to simply lay on a bed of ice. Use a platter, board or tray with a little depth to it for the ice which looks great and of course, will help to keep the ice cream and accompaniments firm and appetising for longer.
To make the chocolate dip, combine broken chocolate pieces and coconut oil in a microwave safe cup or bowl. Microwave for 30 seconds on high, remove, and stir. Return to the microwave for 30 seconds on high, remove and stir. If not fully melted, return for 30 seconds. Dip your frozen fruit or frozen marshmallows into the melt.
Skewers are ideal for summer charcuterie boards. Fruit skewers in particular look great and allow for easy pick-up and dipping. Also, colour blocking is always effective on a charcuterie board and skewers offer a great way to colour block.
Choose a theme to please your guests – brightly coloured cake pops, snakes and frogs work a treat for kids and drunken chocolate-covered fruits for adults are sure to please.
Be sure to include fresh or frozen berries that aren’t chocolate-covered for those who want a healthier option and as a great complement to the ice cream.
Think outside the box: even salty items are a great accompaniment to ice cream. Crunchy textures work well with the softness and smoothness of ice cream. Salted pretzels, caramelised and salted nuts, chopped-up dried fruits, granola or even broken left-over biccies from the pantry are great. A simple coulis to pour on top of the ice cream is also a crowd pleaser.
Sticky Date Cake with Butterscotch Sauce
Pre-heat oven to 180°C (160°C fan-forced). Line the base and sides of 2 x 20cm cake pans.
Combine dates and water in a small saucepan, bring to a boil. Remove from heat, stir in bi-carb and set aside.
Place butter and sugar in the bowl of an electric mixer, beat until pale and creamy. Add eggs one at a time, ensuring well combined before adding the next. Fold in the flour and cinnamon, with the date mixture, mixing until the batter is smooth. Pour batter evenly between prepared pans and bake for 35 minutes, or until cake springs back when gently pressed. Allow to cool for 10 minutes, before removing to a wire rack to cool completely.
Meanwhile, for the sauce, combine sugar, cream and butter in a small saucepan. Bring to a boil, reduce heat to a simmer for 3-4 minutes. Remove from heat and set aside to cool.
Whip cream until soft peaks form, add mascarpone, continue mixing until mixture thickens.
For serving; cut each cake in half horizontally, place one layer on a serving plate, dollop on ¼ of the cream mixture and drizzle with some of the butterscotch sauce. Top with another layer of cake and continue until the final cake layer is on top. Dollop remaining cream on top and drizzle with more butterscotch sauce.
Ingredients
Directions
Pre-heat oven to 180°C (160°C fan-forced). Line the base and sides of 2 x 20cm cake pans.
Combine dates and water in a small saucepan, bring to a boil. Remove from heat, stir in bi-carb and set aside.
Place butter and sugar in the bowl of an electric mixer, beat until pale and creamy. Add eggs one at a time, ensuring well combined before adding the next. Fold in the flour and cinnamon, with the date mixture, mixing until the batter is smooth. Pour batter evenly between prepared pans and bake for 35 minutes, or until cake springs back when gently pressed. Allow to cool for 10 minutes, before removing to a wire rack to cool completely.
Meanwhile, for the sauce, combine sugar, cream and butter in a small saucepan. Bring to a boil, reduce heat to a simmer for 3-4 minutes. Remove from heat and set aside to cool.
Whip cream until soft peaks form, add mascarpone, continue mixing until mixture thickens.
For serving; cut each cake in half horizontally, place one layer on a serving plate, dollop on ¼ of the cream mixture and drizzle with some of the butterscotch sauce. Top with another layer of cake and continue until the final cake layer is on top. Dollop remaining cream on top and drizzle with more butterscotch sauce.
Plant-Based Pavlova with Passionfruit Cream Cheese Frosting
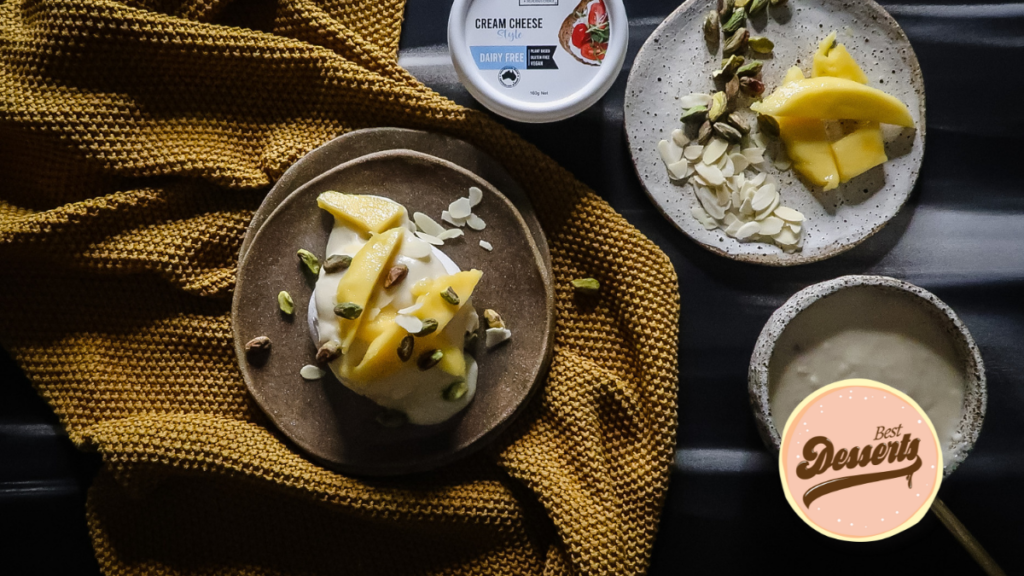
Drain the chickpeas, reserving the canning liquid into an airtight container.
Place the chickpeas in a separate airtight container and refrigerate for another use. Chill the canning liquid for 2 hours or until cold.
Preheat oven to 150°C and line two baking trays with baking paper. When canning liquid is cold, transfer to a stand mixer with a whisk attachment and whisk for 8 minutes, or until mixture turns to soft peaks.
Add sugar, 1 tbs at a time, whisking constantly for 15 minutes or until sugar is completely dissolved, then whisk in the cornflour.
Gently scoop about a ¼ cup mixture per meringue, shape 10(ish)cm rounds onto the baking trays to make 12 meringues.
Place in the oven and immediately reduce oven to 100°C. Bake for 1 hour 15 minutes or until outside of meringue is firm and crisp.
Turn off oven and leave meringues to dry out in the oven for 4 hours, or overnight.
To make your frosting, use your stand mixer to beat the Dairy Free Down Under cream cheese and butter in a bowl until smooth and creamy. Gradually add the icing sugar, in batches, beating well after each addition. Add the passionfruit pulp and beat until well combined.
The next day (or 4 hours later), dollop the dairy free cream cheese mixture over meringues and scatter with fresh mango, pistachios, coconut flakes
Crunch, and enjoy!
Ingredients
Directions
Drain the chickpeas, reserving the canning liquid into an airtight container.
Place the chickpeas in a separate airtight container and refrigerate for another use. Chill the canning liquid for 2 hours or until cold.
Preheat oven to 150°C and line two baking trays with baking paper. When canning liquid is cold, transfer to a stand mixer with a whisk attachment and whisk for 8 minutes, or until mixture turns to soft peaks.
Add sugar, 1 tbs at a time, whisking constantly for 15 minutes or until sugar is completely dissolved, then whisk in the cornflour.
Gently scoop about a ¼ cup mixture per meringue, shape 10(ish)cm rounds onto the baking trays to make 12 meringues.
Place in the oven and immediately reduce oven to 100°C. Bake for 1 hour 15 minutes or until outside of meringue is firm and crisp.
Turn off oven and leave meringues to dry out in the oven for 4 hours, or overnight.
To make your frosting, use your stand mixer to beat the Dairy Free Down Under cream cheese and butter in a bowl until smooth and creamy. Gradually add the icing sugar, in batches, beating well after each addition. Add the passionfruit pulp and beat until well combined.
The next day (or 4 hours later), dollop the dairy free cream cheese mixture over meringues and scatter with fresh mango, pistachios, coconut flakes
Crunch, and enjoy!
Mini Gingerbread Cheesecakes

Preheat oven to 140°c.
Pulse Gingernut biscuits in food processer to create a fine crumb. Combine with melted butter.
Evenly distribute the crumb into each muffin or mini cupcake mould and push down.
In mixer combine cream cheese, sugar, vanilla and mix until smooth.
Pour in cream and beat through – until it starts to thicken.
Add eggs, one at a time and mix through to combine.
Add mixed spice and lemon juice – stir through.
Fill the cheesecake moulds and smooth over.
Bake at 140°c for 20 minutes.
Allow to cool before removing from moulds.
Suggestion: Decorate with Raspberries and serve with Raspberry coulis.
Ingredients
Directions
Preheat oven to 140°c.
Pulse Gingernut biscuits in food processer to create a fine crumb. Combine with melted butter.
Evenly distribute the crumb into each muffin or mini cupcake mould and push down.
In mixer combine cream cheese, sugar, vanilla and mix until smooth.
Pour in cream and beat through – until it starts to thicken.
Add eggs, one at a time and mix through to combine.
Add mixed spice and lemon juice – stir through.
Fill the cheesecake moulds and smooth over.
Bake at 140°c for 20 minutes.
Allow to cool before removing from moulds.
Suggestion: Decorate with Raspberries and serve with Raspberry coulis.
Santa Pancake Hats
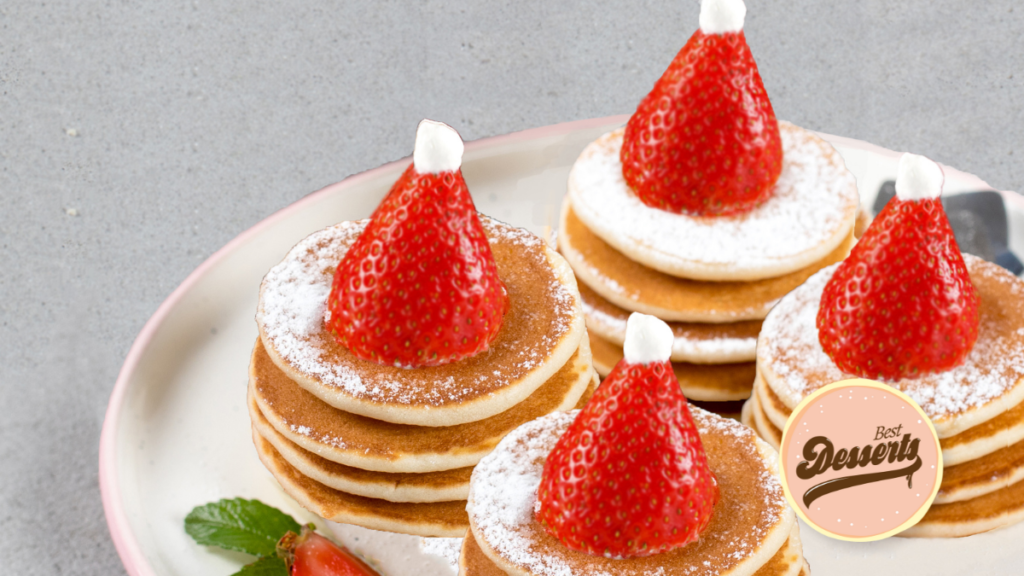
Sieve all dry ingredients together.
In a separate bowl whisk egg, milk, and vanilla together.
Pour wet ingredients into dry ingredients and whisk until thick and smooth.
Heat a non-stick frying pan over medium heat and add small amount of oil or butter to coat the pan. Add spoonful of batter to make small circle pancakes, flipping over when bubbles appear and cook until lightly browned.
Repeat to use up all the batter.
Cut bases from the strawberries to give a flat edge.
Make pancakes in stacks of four, top with a strawberry.
Add the mini marshmallows to the top of the strawberry to complete the Santa Hat.
Dust with icing sugar!
Ingredients
Directions
Sieve all dry ingredients together.
In a separate bowl whisk egg, milk, and vanilla together.
Pour wet ingredients into dry ingredients and whisk until thick and smooth.
Heat a non-stick frying pan over medium heat and add small amount of oil or butter to coat the pan. Add spoonful of batter to make small circle pancakes, flipping over when bubbles appear and cook until lightly browned.
Repeat to use up all the batter.
Cut bases from the strawberries to give a flat edge.
Make pancakes in stacks of four, top with a strawberry.
Add the mini marshmallows to the top of the strawberry to complete the Santa Hat.
Dust with icing sugar!
Dark Chocolate and Hazelnut Wreath with Spiced Cherries
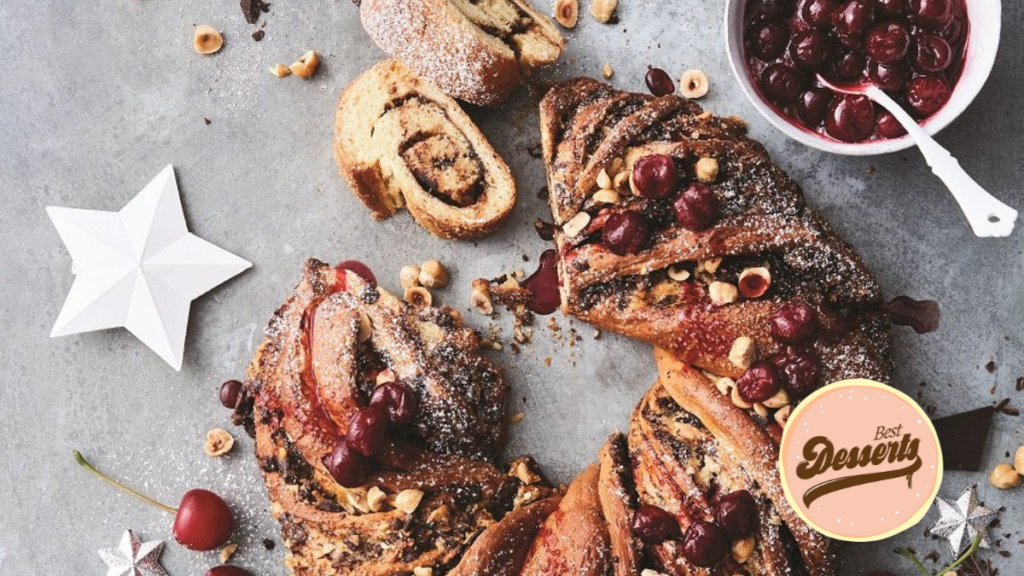
For spiced cherries, stir cherries, sugar, citrus rind and juices in a medium saucepan until sugar dissolves. Simmer for 5 minutes. Remove from heat; refrigerate to chill.
Combine yeast, half caster sugar and milk in a large bowl. Stand in a warm place for 10 minutes. Add egg yolks, butter, ¾ cup warm water, flour, ½ tsp salt and remaining sugar. Stir until combined. Transfer dough to a lightly floured surface, knead for 10 minutes or until smooth and elastic.
Roll dough out on a lightly floured baking paper to a 45cm x 25cm rectangle and place it on a prepared tray. Cover with plastic wrap and refrigerate for 1 hour to firm.
Preheat oven to 200C. Grease a large, flat oven tray. Process hazelnut and chocolate in a food processor until finely chopped.
Combine butter, 1/3 cup demerara sugar, orange rind and mixed spice in a small bowl. Spread butter over dough, leaving a 1cm border. Top with choc-hazelnut mixture and gently press into butter. Firmly roll dough up from one long side, using baking paper as a guide. Trim ends, then cut dough in half lengthwise. Turn halves, cut-side down on baking paper, then twist together. Form twisted lengths into a ring, pressing the two ends together to join.
Transfer ring carefully onto oven tray. Brush with egg wash and scatter with extra Demerara sugar. Bake for 10 minutes. Reduce oven to 180C, bake for a further 30 minutes or until golden. Transfer to a wire rack to cool.
Serve dusted with icing sugar and top with extra chopped hazelnuts, spiced cherries and double cream
Ingredients
Directions
For spiced cherries, stir cherries, sugar, citrus rind and juices in a medium saucepan until sugar dissolves. Simmer for 5 minutes. Remove from heat; refrigerate to chill.
Combine yeast, half caster sugar and milk in a large bowl. Stand in a warm place for 10 minutes. Add egg yolks, butter, ¾ cup warm water, flour, ½ tsp salt and remaining sugar. Stir until combined. Transfer dough to a lightly floured surface, knead for 10 minutes or until smooth and elastic.
Roll dough out on a lightly floured baking paper to a 45cm x 25cm rectangle and place it on a prepared tray. Cover with plastic wrap and refrigerate for 1 hour to firm.
Preheat oven to 200C. Grease a large, flat oven tray. Process hazelnut and chocolate in a food processor until finely chopped.
Combine butter, 1/3 cup demerara sugar, orange rind and mixed spice in a small bowl. Spread butter over dough, leaving a 1cm border. Top with choc-hazelnut mixture and gently press into butter. Firmly roll dough up from one long side, using baking paper as a guide. Trim ends, then cut dough in half lengthwise. Turn halves, cut-side down on baking paper, then twist together. Form twisted lengths into a ring, pressing the two ends together to join.
Transfer ring carefully onto oven tray. Brush with egg wash and scatter with extra Demerara sugar. Bake for 10 minutes. Reduce oven to 180C, bake for a further 30 minutes or until golden. Transfer to a wire rack to cool.
Serve dusted with icing sugar and top with extra chopped hazelnuts, spiced cherries and double cream
Lemon Meringue Tartlets
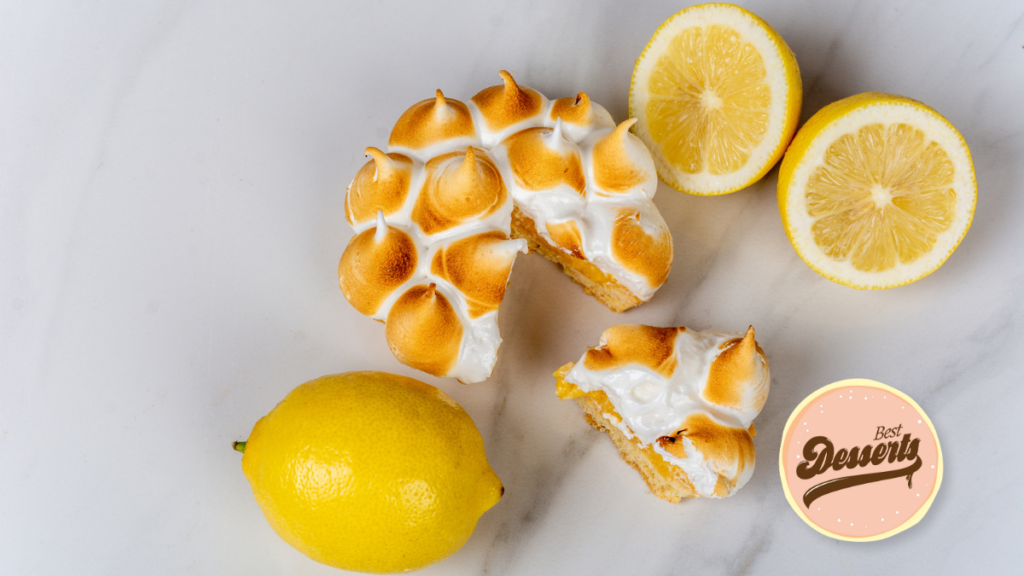
Using a food processor, pulse graham crackers into fine crumbs. Add butter and pulse again to mix together.
Equally split the mixture among six 4-inch tart pans with removable bottoms; press firmly on bottoms and up sides.
Freeze until firm for at least 30 minutes.
In a medium saucepan, combine the cream and sugar and cook on medium to high heat. Continue stirring for 5 minutes. Let it boil, then reduce heat and simmer 1 minute.
Remove the saucepan from heat then add the lemon zest and juice.
Allow to cool for 20 minutes, then equally distribute among crust-lined tart shells and refrigerate until set for at least 2 hours or up to 24 hours.
In a large mixing bowl, whisk together the egg whites, sugar and cream of tartar.
Put the bowl over a saucepan of simmering water to cook the mixture.
Whisking constantly, until sugar has dissolved and whites are very warm to the touch (not hot and overcooked). Continue the process for 5 minutes.
Remove from heat and using an electric mixer, beat on low speed, gradually increasing to high, until glossy, soft peaks form. Do it for about 5 minutes.
Beat in vanilla. Spoon over tarts, then use a torch to lightly toast.
Ingredients
Directions
Using a food processor, pulse graham crackers into fine crumbs. Add butter and pulse again to mix together.
Equally split the mixture among six 4-inch tart pans with removable bottoms; press firmly on bottoms and up sides.
Freeze until firm for at least 30 minutes.
In a medium saucepan, combine the cream and sugar and cook on medium to high heat. Continue stirring for 5 minutes. Let it boil, then reduce heat and simmer 1 minute.
Remove the saucepan from heat then add the lemon zest and juice.
Allow to cool for 20 minutes, then equally distribute among crust-lined tart shells and refrigerate until set for at least 2 hours or up to 24 hours.
In a large mixing bowl, whisk together the egg whites, sugar and cream of tartar.
Put the bowl over a saucepan of simmering water to cook the mixture.
Whisking constantly, until sugar has dissolved and whites are very warm to the touch (not hot and overcooked). Continue the process for 5 minutes.
Remove from heat and using an electric mixer, beat on low speed, gradually increasing to high, until glossy, soft peaks form. Do it for about 5 minutes.
Beat in vanilla. Spoon over tarts, then use a torch to lightly toast.
No-Bake Creamy Mango Cheesecake

In a bowl, prepare the crust first by combining the crushed graham crackers and melted butter. Use a fork to mix the ingredients well.
Then, press firmly into a 9” inch spring form pan. Chill until set or for 15 minutes.
Dissolve 2tbsp. unflavored gelatin in ¼ cup lukewarm water.
In a food processor or blender, combine the softened cream cheese, condensed milk and all-purpose cream.
Gently add in dissolved gelatin and blend until mixture is smooth.
Pour mixture into prepared crust and decorate on top with prepared mango slices.
Make another 1tsp. dissolved gelatin in ¼ cup water and drizzle it on top until covered smoothly.
Chill for at least 4 hours until completely set.
Ingredients
Directions
In a bowl, prepare the crust first by combining the crushed graham crackers and melted butter. Use a fork to mix the ingredients well.
Then, press firmly into a 9” inch spring form pan. Chill until set or for 15 minutes.
Dissolve 2tbsp. unflavored gelatin in ¼ cup lukewarm water.
In a food processor or blender, combine the softened cream cheese, condensed milk and all-purpose cream.
Gently add in dissolved gelatin and blend until mixture is smooth.
Pour mixture into prepared crust and decorate on top with prepared mango slices.
Make another 1tsp. dissolved gelatin in ¼ cup water and drizzle it on top until covered smoothly.
Chill for at least 4 hours until completely set.
Strawberries and Cream Buttermilk Panna Cotta
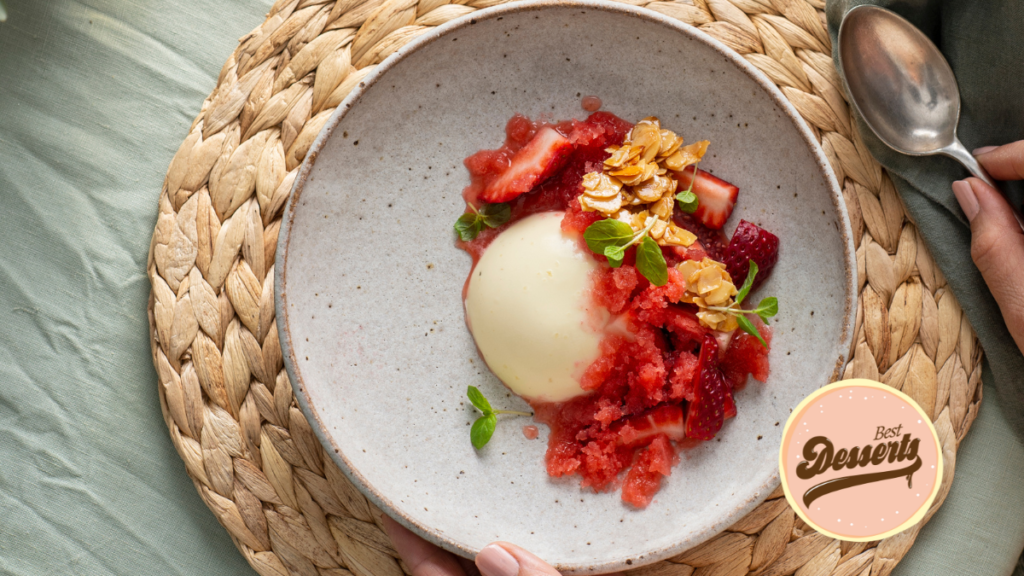
Turn your Smeg blast chiller to the “creams and mousses” function and pre-run to cool the compartment. Lightly grease six ¾-cup (190ml) dariole molds or ramekins. Place onto a baking tray.
Pour water into a small bowl; add gelatin and whisk until dissolved. In a medium saucepan, gently heat cream, buttermilk, honey, and vanilla and stir until well combined. Cool slightly; add gelatin and mix well.
Pour the cream mixture evenly among prepared molds or ramekins. Place in the blast chiller and press start (alternatively, you can set these in the fridge for 3-6 hours).
Meanwhile, to make the Strawberry Jam, blend strawberries with water in a food processor or blender. Strain and discard seeds; pour liquid into a small saucepan with honey and cook until well combined and just heated. Set aside to cool.
Pour half of the strawberry mixture into a small bowl and stir through the chia seeds, place in the fridge to set. For the granita, mix the remaining strawberry mixture with kombucha and pour it into a lamington tray. Place in the blast chiller for 1 hour or until set. Using a fork, scrape the surface until flakes appear; return the flakes to the freezer until you’re ready to serve.
Meanwhile, preheat oven to 160°C fan-forced; mix almonds and honey; pour onto a baking tray lined with baking paper; bake for 10 minutes or until golden; allow to cool on the tray. Break into clusters.
To serve, tip out panna cotta onto plates and serve with strawberries, jam, granita, and almond clusters.
Panna cotta can be made 2 days in advance, stored in the fridge, and turned out just before serving.
The granita can be made 2 weeks in advance and stored in the freezer.
Strawberry jam can be made 2 days in advance and stored in the fridge.
Ingredients
Directions
Turn your Smeg blast chiller to the “creams and mousses” function and pre-run to cool the compartment. Lightly grease six ¾-cup (190ml) dariole molds or ramekins. Place onto a baking tray.
Pour water into a small bowl; add gelatin and whisk until dissolved. In a medium saucepan, gently heat cream, buttermilk, honey, and vanilla and stir until well combined. Cool slightly; add gelatin and mix well.
Pour the cream mixture evenly among prepared molds or ramekins. Place in the blast chiller and press start (alternatively, you can set these in the fridge for 3-6 hours).
Meanwhile, to make the Strawberry Jam, blend strawberries with water in a food processor or blender. Strain and discard seeds; pour liquid into a small saucepan with honey and cook until well combined and just heated. Set aside to cool.
Pour half of the strawberry mixture into a small bowl and stir through the chia seeds, place in the fridge to set. For the granita, mix the remaining strawberry mixture with kombucha and pour it into a lamington tray. Place in the blast chiller for 1 hour or until set. Using a fork, scrape the surface until flakes appear; return the flakes to the freezer until you’re ready to serve.
Meanwhile, preheat oven to 160°C fan-forced; mix almonds and honey; pour onto a baking tray lined with baking paper; bake for 10 minutes or until golden; allow to cool on the tray. Break into clusters.
To serve, tip out panna cotta onto plates and serve with strawberries, jam, granita, and almond clusters.
Panna cotta can be made 2 days in advance, stored in the fridge, and turned out just before serving.
The granita can be made 2 weeks in advance and stored in the freezer.
Strawberry jam can be made 2 days in advance and stored in the fridge.
Vanilla Raspberry Panna Cotta
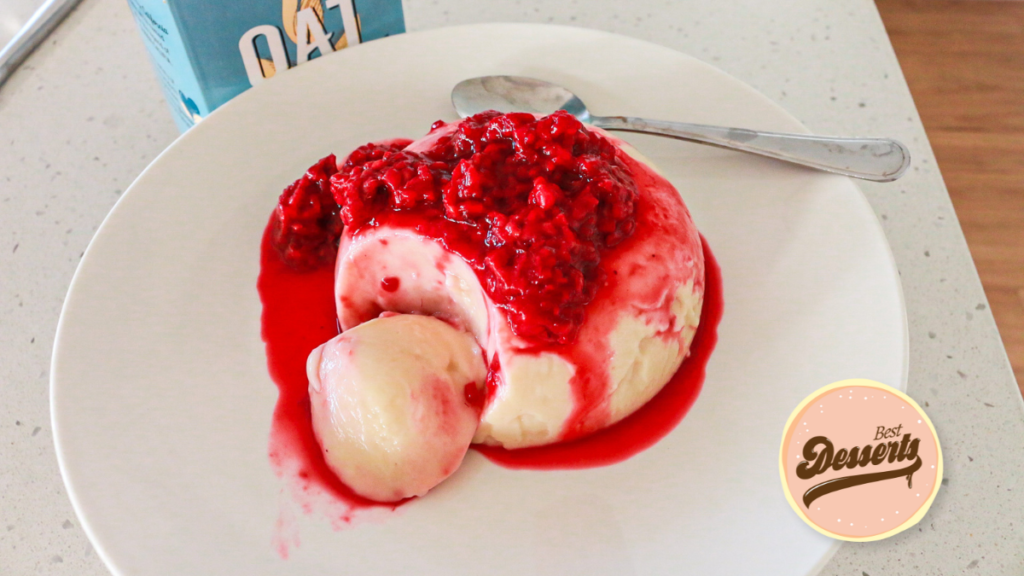
Whisk together the oat milk, corn flour, and syrup so no lumps remain.
Cook, stirring, over medium heat until thickened, then pour into a ramekin and leave in the fridge to set for 2-3 hours.
For the compote, heat raspberries with a dash of water in a pot or microwave (with optional sweetener) until jammy. Leave to cool.
Serve Panna Cotta topped with raspberry compote!
Ingredients
Directions
Whisk together the oat milk, corn flour, and syrup so no lumps remain.
Cook, stirring, over medium heat until thickened, then pour into a ramekin and leave in the fridge to set for 2-3 hours.
For the compote, heat raspberries with a dash of water in a pot or microwave (with optional sweetener) until jammy. Leave to cool.
Serve Panna Cotta topped with raspberry compote!
Spiced Festive Cake

Preheat the oven to fan forced 160°C/180°C/350°F/Gas mark 4. Line a 20-22cm cake tin.
If your pumpkin is raw - roughly chop and steam it.
Roughly chop the dates and soak in the hot water in a tall jug or bowl with high sides. Set aside.
Sift cacao, baking powder, cinnamon, ginger and cardamom into a large bowl with the flour, orange zest, almonds and chocolate and mix. Set aside.
Melt the butter and pour over the dates and hot water, add the pumpkin and eggs and blitz to combine using a stick blender.
Add wet ingredients to the dry and fold through until just combined (it may look a little stodgy).
Tip cake batter into pre-lined tin and bake for 15 minutes. Rotate in the oven and bake for a further 10-15 minutes until an inserted skewer comes out clean.
While baking, make the ricotta drizzle - combine ricotta with orange juice, mix until smooth.
Let the cake cool completely before topping generously with the ricotta.
Garnish with dried orange slices if you wish, and serve between ten.
Tips:
- To make it extra pretty - garnish with dried orange slices, edible flowers or how you wish.
- If you want it extra spiced - add an extra teaspoon of each cardamom, cinnamon and ginger.
- Store leftovers in an airtight container in the refrigerator for up to 3 days. Serve cold or reheat slightly.
- Cook and freeze in portions for up to 2 months. Defrost before serving.
Ingredients
Directions
Preheat the oven to fan forced 160°C/180°C/350°F/Gas mark 4. Line a 20-22cm cake tin.
If your pumpkin is raw - roughly chop and steam it.
Roughly chop the dates and soak in the hot water in a tall jug or bowl with high sides. Set aside.
Sift cacao, baking powder, cinnamon, ginger and cardamom into a large bowl with the flour, orange zest, almonds and chocolate and mix. Set aside.
Melt the butter and pour over the dates and hot water, add the pumpkin and eggs and blitz to combine using a stick blender.
Add wet ingredients to the dry and fold through until just combined (it may look a little stodgy).
Tip cake batter into pre-lined tin and bake for 15 minutes. Rotate in the oven and bake for a further 10-15 minutes until an inserted skewer comes out clean.
While baking, make the ricotta drizzle - combine ricotta with orange juice, mix until smooth.
Let the cake cool completely before topping generously with the ricotta.
Garnish with dried orange slices if you wish, and serve between ten.
Three Ingredient Mango Mousse
Remove the flesh of each mango.
Puree the mango in a blender.
Whip the cream until stiff peaks form.
With the mixer running add the condensed milk in a steady stream.
Do the same with the mango puree.
Serve in pretty glasses or jars, garnished with fresh fruit.
This recipe may also be frozen and served like ice cream.
Ingredients
Directions
Remove the flesh of each mango.
Puree the mango in a blender.
Whip the cream until stiff peaks form.
With the mixer running add the condensed milk in a steady stream.
Do the same with the mango puree.
Serve in pretty glasses or jars, garnished with fresh fruit.
Carrot Cake With Orange Cream Cheese Frosting
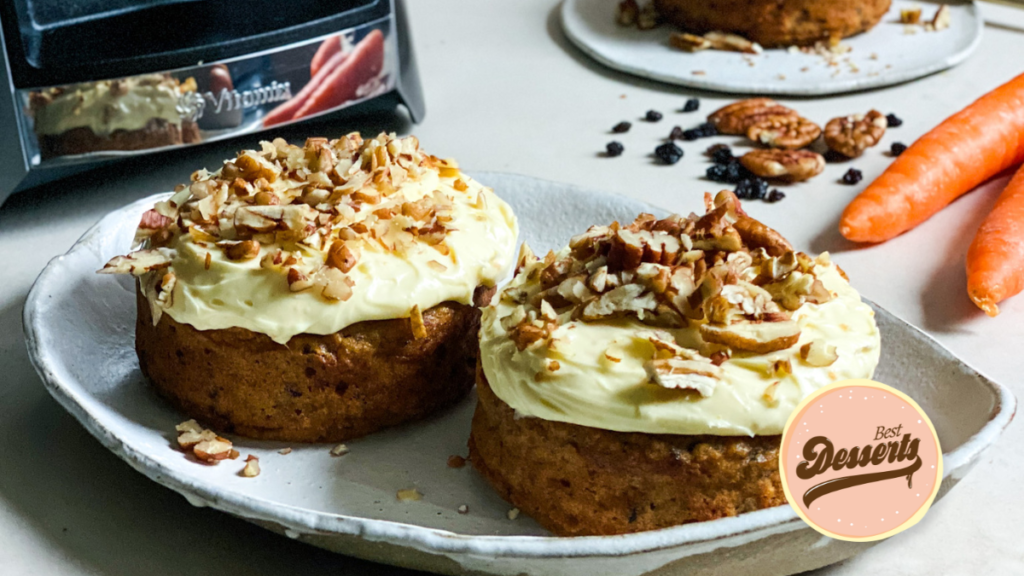
Preheat an oven to 180C then grease and line cake tin/s with baking paper.
Add the pecans to the jug of the Vitamix Ascent Series blender and blend on speed 1
just for 10-20 seconds to crush them but not to a powder.
Tip them into a bowl then add the carrots to the blender and blend them on speed 2
for 30 seconds to create a rough breadcrumb texture.
Add the remaining cake ingredients and 2/3 of the ground pecans. Blend on speed 2 for just 20 seconds to combine everything.
Spoon the cake mix into the prepared tin/s and smooth out the batter with the back of a spoon.
Bake for approximately 25-30 minutes until the cake is firm in the center and a dry skewer or small knife comes out clean.
Allow to cool for 10 minutes then unmould and cool completely before covering with the frosting.
For the frosting, combine the ingredients in a clean jug of the blender and blend on speed 3 for 30 seconds, scraping down the sides, and blend again for 20 seconds. Spoon this over the completely cooled cakes and finish with the remaining pecans.
Ingredients
Directions
Preheat an oven to 180C then grease and line cake tin/s with baking paper.
Add the pecans to the jug of the Vitamix Ascent Series blender and blend on speed 1
just for 10-20 seconds to crush them but not to a powder.
Tip them into a bowl then add the carrots to the blender and blend them on speed 2
for 30 seconds to create a rough breadcrumb texture.
Add the remaining cake ingredients and 2/3 of the ground pecans. Blend on speed 2 for just 20 seconds to combine everything.
Spoon the cake mix into the prepared tin/s and smooth out the batter with the back of a spoon.
Bake for approximately 25-30 minutes until the cake is firm in the center and a dry skewer or small knife comes out clean.
Allow to cool for 10 minutes then unmould and cool completely before covering with the frosting.
For the frosting, combine the ingredients in a clean jug of the blender and blend on speed 3 for 30 seconds, scraping down the sides, and blend again for 20 seconds. Spoon this over the completely cooled cakes and finish with the remaining pecans.
Mini Strawberry Santas

Mini Strawberry Santas are one of the best Christmas desserts you can make to get your kids to eat fruit over the holiday period, rather than just sugar! They're simple to make, and brighten up every Christmas table. Plus, you'll look like a creative superstar for your efforts!
Cut the hulled-side strawberries so they can stand up on a plate. Slice the tip off each strawberry to make the 'hat'; set aside.
Beat cream and confectioners' sugar in a glass or metal bowl until soft peaks form. Lift your beater or whisk straight up: the whipped cream will form soft mounds.
Spoon a large dollop of whipped cream on top of strawberry base for the 'face' and 'beard'. Set the 'hat' atop the 'face'. Add a dot of whipped cream, using a toothpick, on top of the 'hat' for the 'pom-pom' and 2 dots on the strawberry base for 'buttons'. Place 2 sprinkles on the 'face' for 'eyes'.
Ingredients
Directions
Cut the hulled-side strawberries so they can stand up on a plate. Slice the tip off each strawberry to make the 'hat'; set aside.
Beat cream and confectioners' sugar in a glass or metal bowl until soft peaks form. Lift your beater or whisk straight up: the whipped cream will form soft mounds.
Spoon a large dollop of whipped cream on top of strawberry base for the 'face' and 'beard'. Set the 'hat' atop the 'face'. Add a dot of whipped cream, using a toothpick, on top of the 'hat' for the 'pom-pom' and 2 dots on the strawberry base for 'buttons'. Place 2 sprinkles on the 'face' for 'eyes'.
Christmas Pudding With Citrus And Spice

Christmas pudding with citrus and spice, yum! A fruity pudding that is served with ice cream is all you’ll want for a dessert after a very satisfying Christmas dinner. What’s more, this pudding can last up to a year in storage. Put a little extra time aside when making this delicious Christmas dessert, as you’ll need some extra patience because of the overnight soaking period for some ingredients. But no worries, everything will be worth it!
Mix together the fruits, almonds, citrus zests, and the carrot with the brandy and orange liqueur in a large mixing bowl. Cover and leave to soak overnight.
Combine all the dry ingredients together, then add to the soaked fruit mixture. Blend in the butter, add the eggs and stir well.
Grease a 1.5-litre pudding basin with butter and line the base with greaseproof paper. Place the mixture and compress it firmly and make a hollow using back of the spoon in the centre.
Cover the surface with another round of greaseproof paper, then cover the bowl with double-thickness greaseproof paper and foil then tie at the rim with string to secure the cover. Lower the pudding into a pan with an upturned saucer in the base (you may also opt to use other things to elevate the pudding container), then fill with water until it comes halfway up the sides of the bowl. Steam for 6 hrs. You may need to add water occasionally at it will evaporate as it boils.
Steaming it in the oven is also an alternative. You’ll have to put your pudding basin in a roasting tin filled with water, then cover with a tent of foil and cook for the same length of time at 160C/fan 140C/gas 3. You may need to add water occasionally at it will evaporate as it boils, just like in our first option. (step 4)
Rest and cool, before storing in a cool, dry cupboard. The pudding will keep for up to a year.
Every time you’ll serve a pudding, it has to be steamed for 1 hr before turning out, garnish it with holly and serve with extra-thick double cream or vanilla ice cream.
Ingredients
Directions
Mix together the fruits, almonds, citrus zests, and the carrot with the brandy and orange liqueur in a large mixing bowl. Cover and leave to soak overnight.
Combine all the dry ingredients together, then add to the soaked fruit mixture. Blend in the butter, add the eggs and stir well.
Grease a 1.5-litre pudding basin with butter and line the base with greaseproof paper. Place the mixture and compress it firmly and make a hollow using back of the spoon in the centre.
Cover the surface with another round of greaseproof paper, then cover the bowl with double-thickness greaseproof paper and foil then tie at the rim with string to secure the cover. Lower the pudding into a pan with an upturned saucer in the base (you may also opt to use other things to elevate the pudding container), then fill with water until it comes halfway up the sides of the bowl. Steam for 6 hrs. You may need to add water occasionally at it will evaporate as it boils.
Steaming it in the oven is also an alternative. You’ll have to put your pudding basin in a roasting tin filled with water, then cover with a tent of foil and cook for the same length of time at 160C/fan 140C/gas 3. You may need to add water occasionally at it will evaporate as it boils, just like in our first option. (step 4)
Rest and cool, before storing in a cool, dry cupboard. The pudding will keep for up to a year.
Every time you’ll serve a pudding, it has to be steamed for 1 hr before turning out, garnish it with holly and serve with extra-thick double cream or vanilla ice cream.
Mayver’s Christmas Gingerbread

Christmas Gingerbread is a staple of every Christmas, and there is no better recipe than this one from Susie Burrell that uses the delicious Mayver's Skin On Peanut Butter. If you're looking for the best Christmas dessert for your table this year, then look no further.
Place butter and peanut butter in a medium mixing bowl. Mix well with an electric beater until light and fluffy. Add sugar, egg and vanilla and pulse until well combined.
Stir in spices and flours. Place in the fridge for 1 hour to rest.
Preheat the oven to 180C/160C (fan-forced) and line three baking trays with baking paper.
Use a lightly floured rolling pin to roll out dough on a large sheet of baking paper until 4-5mm thick. Cut out gingerbread men with your desired cutter and place onto lined baking trays. Repeat with remaining mixture.
Bake for 10 minutes or until golden.
RECIPE TIP: If you’re looking for an alternative to brown sugar, try honey or rice malt syrup.
Ingredients
Directions
Place butter and peanut butter in a medium mixing bowl. Mix well with an electric beater until light and fluffy. Add sugar, egg and vanilla and pulse until well combined.
Stir in spices and flours. Place in the fridge for 1 hour to rest.
Preheat the oven to 180C/160C (fan-forced) and line three baking trays with baking paper.
Use a lightly floured rolling pin to roll out dough on a large sheet of baking paper until 4-5mm thick. Cut out gingerbread men with your desired cutter and place onto lined baking trays. Repeat with remaining mixture.
Bake for 10 minutes or until golden.
Isagenix Reindeer Treats

The perfect family friendly snack, Isagenix Reindeer Treats are a creative addition to the Christmas table and will be enjoyed by all!
Cut the IsaLean Bars into pieces.
Place all ingredients into a bowl and mix together.
Store in an airtight container.
Ingredients
Directions
Cut the IsaLean Bars into pieces.
Place all ingredients into a bowl and mix together.
Store in an airtight container.
Mayver’s Christmas Bark

Mayver’s Christmas Bark is simple to make and is a lot of fun to make with your kids. It's one of the best Christmas desserts we have seen, and it looks amazing!
Melt chocolate over low heat. Stir in peanut butter.
Pour into baking tray lined with baking paper.
Top with a mix of cranberries, pretzels and pistachios.
Allow to set in fridge for 2-3 hours. Then break and serve.
Ingredients
Directions
Melt chocolate over low heat. Stir in peanut butter.
Pour into baking tray lined with baking paper.
Top with a mix of cranberries, pretzels and pistachios.
Allow to set in fridge for 2-3 hours. Then break and serve.
Vegan Eggnog

A recipe from Vegan by Eden
This December I’m getting festive with some creamy vegan eggnog! There’s nothing more perfect for vegan eggnog than the Califia Farms Unsweetened Vanilla almond milk. It’s creamy, delicious and when paired with the cinnamon and nutmeg it’s a match made in heaven. You can enjoy this eggnog with or without a little rum. I like it served as is and chilled - so good on a warm summer day. I hope you all give this a try and get in the festive spirit with me.
In a small pot combine the Califia Farms Unsweetened Vanilla almond milk with the maple syrup, nutmeg and mixed spice. Stir gently on a low heat.
Add the cinnamon stick and continue to stir for 8-10 mins while the milk thickens up slightly.
Pour the mix into a jug and refrigerate overnight.
Once chilled the eggnog is ready to serve. You could enjoy it warm if you prefer but let it refrigerate overnight so the flavour deepens.
Sprinkle some extra cinnamon on top to serve.
*Optional - add a little rum or bourbon if you would like it with some liquor.
Ingredients
Directions
In a small pot combine the Califia Farms Unsweetened Vanilla almond milk with the maple syrup, nutmeg and mixed spice. Stir gently on a low heat.
Add the cinnamon stick and continue to stir for 8-10 mins while the milk thickens up slightly.
Pour the mix into a jug and refrigerate overnight.
Once chilled the eggnog is ready to serve. You could enjoy it warm if you prefer but let it refrigerate overnight so the flavour deepens.
Sprinkle some extra cinnamon on top to serve.
*Optional - add a little rum or bourbon if you would like it with some liquor.
Isagenix Jingle Juice

Looking for a refreshing drink to cool down with this Christmas? Isagenix has you covered with its delicious Jingle Juice.
 Hydrate OR Hydrate OR
Mix all ingredients in a large punch bowl with ice.
Stir until fully dissolved.
Enjoy!
Please note, the Isagenix Jingle Juice drink is only for people aged 16+
Ingredients
Hydrate OR Hydrate ORDirections
Mix all ingredients in a large punch bowl with ice.
Stir until fully dissolved.
Enjoy!
Please note, the Isagenix Jingle Juice drink is only for people aged 16+
Vegan Christmas Cookies

Why not leave Santa some vegan Christmas cookies and almond milk this year? These are probably the best Christmas cookies I’ve made yet. Vegan white chocolate, macadamia and cranberry cookies using Califia Farms Unsweetened Vanilla Almond Milk.
The unsweetened vanilla almond is my favourite of all the Califia milks, it’s so special tasting, great to use in porridge or desserts but we honestly just love to drink it on its own because it’s that good! My toddler is obsessed with it! Cookies and milk is my most favourite Christmas tradition, and I bet Santa is going to love these!
In a large bowl, sift together the flour, baking soda and coconut sugar.
Add the cashew butter and tahini and mix until combined and chunky.
Add almond milk and mix again until cookie batter forms.
Mix through white chocolate chips, macadamias and cranberries.
Form tablespoon-sized cookie balls and flatten slightly, place on tray with plenty of room to spread.
Bake at 170 C for 15 - 20 min.
Allow to cool and enjoy with a cool glass of Califia Farms almond milk!
Talida Voinea is a plant-based mum from Newcastle who is recovering from a life-threatening hormone imbalance through diet. Follow her Instagram here: @hazel_and_cacao
For more details on Califia Farms visit: califiafarms.com.au or head to @califiafarmau
Ingredients
Directions
In a large bowl, sift together the flour, baking soda and coconut sugar.
Add the cashew butter and tahini and mix until combined and chunky.
Add almond milk and mix again until cookie batter forms.
Mix through white chocolate chips, macadamias and cranberries.
Form tablespoon-sized cookie balls and flatten slightly, place on tray with plenty of room to spread.
Bake at 170 C for 15 - 20 min.
Allow to cool and enjoy with a cool glass of Califia Farms almond milk!

source https://www.bestdesserts.co/best-christmas-desserts-and-best-christmas-recipes/

Comments
Post a Comment